Sunday, October 20, 2013

Sewing Machine Cover

I made this awesome cover today for by beautiful new-to-me Bernina. She was missing her original case when I purchased her. I don't feel the need to have a hard case since I don't plan to be moving this door stop often.
Lucky I bought this perfect fabric a few years ago in North Carolina. "Sew Happy" Monaluna for Robert Kaufman was created for my Bernina! I had always wanted to make accessories for my sewing machine. It just took me the inspiration to create. So I set off to make a machine cover.
I wanted it to cover the attached table, since I always have it on the machine. So the cover need to be an odd shape. I measured the machine twice and wrote down my measurements on a small sketch of the cover. It ended up being three rectangles on the front top and back while the two ends are large trapezoids. 

I even put this awesome pocket on the end. I used a high-loft batting and quilted it to create stiffer plannels so it would stand up on its own.
I put a simple loop on the top along with a wide trim.  I simply wanted to get all the fabrics in there but found the black and white super distracting.  I need to cut it up smaller and decided to brake it up with a trim.  The stripe down the middle of the front and back plannels came about because the white fabric was not wide enough by only 2 inches.  Therefore I threw in the red button strip. I find that working with 3 complementary fabrics are easier to design with than 2 or 4. I am so happy with this awesome item. 
I liked making this cover because I created the pattern and I was able to use many different stitches on the machine and I practiced the free hand quilting. I quilted the black Saftey pin pocket with a simple straight stitch but for the other pannels I used the darning foot and did some tight curly cues around the buttons on the red fabric. For the white fabric with the sewing machines I whent a bit bigger with my loops and curves. I used and awesome zigzag for finishing off the bottom edge. 
The machine did great piecing together the pannels. My old machine would have binded up in the corners. The Bernina never faultered. I am in love. 

Thursday, October 17, 2013

Stamp Layering

I was rather sick to my stomach this morn so I stayed home from work today and made soup. I got a bit bored of my cycle of pintrest, TV and books.   I recently admired Genine's stamps and had wanted to carve some up for my Christmas cards this year. Last year, I did the water colored scene. I loved those, but wanted to change it up a bit.
I started by sketching designs on to a larger index card since that would be the general size of the overall image. I ended up wanting to make a scene that only could be achieved by making multiple stamps to layer to create depth. I went for a mountain scene with moon and trees. I decided on simple designs that I can use at later times, other than for Christmas cards.
I made the simple triangles stamp first. I free handed the triangles onto the master carve based off the earlier sketches I did. I am not a skilled carver so I started with the basic exact-o knife to cut straight lines into the master carve, trying not to go too deep. I took thin layers of the background off in small sections. I tested it out many times. Cleaning it up as I went along. As seen above, on my test scrap I sketched in the mountains and moon onto the opposite side of the master block from the trees. This master carve block is so thick and expensive ($35 for a 8x11 thick sheet).  It helps me get more stamps and I know it will be the same size to match up the images.  
I used a rollerball carver on the mountain side, trying to do continuous cuts in order to keep the lines smooth. As you can see I don't always keep true to the ball point line. The extra bump in the middle mountain felt natural when I carved and looked great when I tested it. The fine tip helped make the fine valleys. I started clearing the sky with wide curve tip with the intention to take it all out. I kept with the line of the mountain I had cut first and created these great curves. I did a test and loved the effect it left in the sky. Cleaning out high spots until I liked it.
I started layering it up with the triangles. I love the placement. I will say that working with double sided stamp is messy and I now have ink all over. It would be best to have a similar size of cardboard to sandwich between your hand. The ball point ink will come off in the first few stamps but, will soon fade. Also, working with exact-o knives and rollerballs is tricky, always point away from yourself and go slow. The top middle one in the image above was the final stamp.
I am known to mix inks which eventually dirtys the lighter colors. I always lay the stamp face up on the table and apply the ink pad with my hand. I think most people do it the opposite way. This helps me mix colors on the triangles to look like trees in the above image. Also, I could make the moon or half the triangles a diffrent color or achieve shading in the right spots.
Here are some awesome triangles by themselves will make nice wrapping paper. I ended up switching colors and getting kind of purple trees. This can be avoided by stamping off all the ink on scraps. I like when there traces and it creates variation. It also allowed me to see that the triangles in a  non-Christmas color are an awesome pattern to have as a stamp.

Saturday, October 12, 2013

Pumpkin Basket


I have crocheted pumpkins before. I gifted those cute guys to my Mom a few years ago. I decided I wanted some in my home again.  I loved this thicker natural orange in the store more because of its color. When started to make my basic pumpkin and realized that I could create a rather cool basket due to the thicker yarn keeping its shape well. I stopped when I felt I had a good size and created a handle out of the green that was wider at the bottom than at the top. I ended up with a bit of orange yarn left over and decided to make the baby pumpkin, which I stuffed. Of course, I didn't use a pattern and ended up ripping out my stitches when it wasnt the right size. I enjoy this process of figuring it out on my own and making it my very own style.
 I filled the basket pumpkin with candy which made it a fat ole' pumpkin, when it is empty it is a bit floppy which I like. I hope to have these awesome pumpkins for a long time.

Monday, October 7, 2013

Sewing Loves

This is the tree right down the street from my house. There are a lot of beautiful trees in town right now. I love this one in particular. The blue sky against the orange leaves. Very nice indeed. As long as the Oregon rain is holding off, I am enjoying this fall weather.
I am planning ahead for the rainy season and purchased a beautiful vintage Bernina 930 record. I have dreamed of owning a Bernina mechanical machine and this is about as expensive as I can go in the Bernina world. Its amazing to think, a 1984 is consider vintage and it is still worth a nice chunk of change. She was serviced regularly and had one owner.
I found this beauty on craig's list this weekend and jumped on it. The purchase included 12 feet, the manual, original bobbin case, a walking foot, table extension and so many other goodies. The machine was 6 blocks away, the whole time!  The slightly dissapointing items missing from the sale were the case and knee lever, which I may have this welder guy I know make for me. It would cost over $200.00 to replace these missing items through a dealer, so I think that will have to wait a bit. This is a very expensive machine for me but, I think it is a true investment.  I feel if I keep it in great running condition it will hold it's value, if not continue to rise.
Stay tuned to see what projects I come up with. I have quite a few planned. I love the way the machine sounds, much like a ticking clock. I still cant believe it is mine. She is so strong and lovely. 

Saturday, September 21, 2013

Baby Quilt

I recently moved into a much larger rental and have so much more space to quilt. I have an entire loft space in which I can make a mess and never have to clean up when people are coming over. Now, I can just close the door.
I have been putting off making this quilt due to lack of space. My dear friend is having her first child. She originally said she was going to have a gender neutral baby room. After preliminary photos were sent to me, I realized her idea of gender neutral was different than mine. I am thinking primary colors, or yellows and teal or grey and orange. She went for a country chic look. I love it. I was able to use some of my favorite fabrics I have been hoarding for years. The white with tiny purple flowers is from the first set of fabrics I ever purchased at the ripe age of 13. The solid yellow is from vintage sheets I got from my grandfathers house when he passed, they are ohh sooo soft. The yellow with tiny flowers is my absolute favorite fabric in my entire collection. I have many items in my life made from this fabric; top, bag, pillow, jewelry roll. I still have 3 or 4 yards left even after making this quilt. I started with strips. The chambray is timeless, a true favorite of mine. I love denim or denim looking items. Gotta **~ LoVe~** the stories that fabrics hold.
Then I struggled with my initial design intentions. I wanted to do the plus pattern, unfortunately I cut all my green strips the wrong direction. So, when I laid it out, the direction of the birds on the lines drove me crazy and the pink popped too much. I realized it wouldn't easily be pieced together, even if I changed the direction of the plus.


I left my quilt laying out for a few days while I pondered over its fate. I totally scrapped the whole idea and when for something else. I HAVE to get it finished this weekend, the baby is due in a week so...hopefully I'll have a pic for you soon.
Instead of a finished shot of the quilt, I leave you with a beautiful image of Crater Lake, OR and Wizard Island in the middle, from last weekend. Vacations get in the way of my quilting often, maybe if I didn't live in such a beautiful state. Nawwhh.

Sunday, September 1, 2013

Basket and Pouf Done!


 I have finished my foot stool pouf. It took very little time. After much deliberation I settled on making it 20x20x13, I didn't have quite enough fabric to make it 20x20x20 .I love it . I still think it could use a bit of foam so that it could serve as a stool, not just a foot rest. I really made it to got with these awesome chairs, I got for a steal over a year ago.   I think the dog likes it too. She is still too big to even think about curling up on this one.    


I also completed this crochet basket that I remade about 6 times in order to get the dimensions I was looking for. I love how this came out with the handle and all. Not quite sure where it will go, but I do think it is a nice size.

Saturday, August 31, 2013

Foot Stool Creations

 
I collect little footstools, I have a few too many. So naturally I just want to make more. This little black wicker one is getting over used and honestly it's not too comfortable.  This nice older comforter is a lovely under my tired feet, but far too used for a bed.  I am off to make a foot rest using a twill scrap that I paid 20 bucks for and stuff it with the old comforter.  
I think I might use a few old large scraps of batting and tshirt a to fill it up too. Iam going to do my calculations and see if I can't get two footstool out of the fabric. 

This isn't the first time I've made stools.  Check these awesome ones my dad helped me build about 12 years ago, I love them. I have carted them around through college and across the country. 
Not the best picture but you get the idea. I tie dyed the denim with bleach for the tops and pillows. I adore them, but I need to add more foam so they are more comfy.  


Saturday, July 20, 2013

Happy Growing

Its been hot here and our Earth Day Garden has been growing. We had to move them off the stoop they got to be so big. I hope that we can get to them before the squirrels do. 
Our yard has turned into hay and started to crack. It is amazing to me that it can rain for 7 months straight and then this summer it is already dry. It seems like it just stopped raining. People don't really plant much into the ground with out a ton of topsoil or using container gardens. It has been quite lovely here. It is hot but, with out humidity and the constant breeze. I am rather enjoying it. We have done quite a bit of traveling, which I hope to share images soon.
 I am quite proud of our maters:
I am also quite proud of my Tater:
She turned 10 the other day! Kuma Bear, Tater Tot, Sweet Tater, Baby Girl, Fat Ass...is one happy dog.  This is her favorite bone and has been with us for many years. She is doing well for her age, she is a bit stiff, lazy and sometimes grumpy. Who can blame a 70 year old! She still loves to play at her age, get dirty, and eat. She is my protector and best friend. 

I love having her by my side and she seems to love being there too. She is such a well behaved happy buddha! She sure has grown since we got her, back when hubby and I started dating. Its hard to imagine life with out her. Happy Birthday Kuma!
 

Thursday, July 18, 2013

Adorable Baby Sweater


Don't you just love this sweater. Well, I adore it, and you should too.  I started off really wanting to crochet something and challenge myself all while making a baby gift. Ive never crochet much more than straight rows for scarves and blankets or spirals for hats, bowls and eggs.  I watched a few YouTube videos and settled for this one by Mickey. I liked there was room for a bit of creativity and I didn't need to count stitches much past the second row.  I loved this pattern and and see how easy it would be to size up. Ended up not being so challenging but, more eye opening. Here she is with no trim/border:
Looks so much cleaner with the white trim. I am flipping out I love this so much. I think my dear friend will too.  I want to make another one out of cotton yarn a bit bigger. This is out of acrylic from my stash. I went for the green I had on hand, since they want to go with gender neutral baby items, even though they know they are having a girl. 
I am over the moon also that it only took two evenings while trying to cool off in front of the T.V. Good thing it's a baby sweater since I would be melting while trying to finish this project up. Hopefully it will keep the little one warm in Fall. Maybe Hat to match? I think yes.

Wednesday, July 10, 2013

Homemade Baby Stuff

I started on the collection of baby stuff I want to make for my friend. She is having a baby girl and wanted a fairly gender neutral baby room. She lives in Boston and the baby will be born in October. I am thinking she needs some warm items for her first winter. So I pulled out the flannel to go shopping for more flannel. I started to cut samples and realized that I had about 10 yards of this awesome zigzag flannel (I got it 75% off when the local Jo-ann's closed). I determined it was gender neutral enough with the blue flannel. I ran with it. I am pretty certain she will think I have lost my mind. Its okay she did a long time ago. I am rather broke for the summer so I figured I should use up what I have. So here we go...
This is about the 8th baby sensory ball I have made. I love them, they are super easy to make, wash up well and look expensive. My mom purchased the pattern for me years ago when everyone my age started popping their babes out. I have remade the template for the two pieces but, lost the directions. I always seem to be able to make one after thinking I wont remember how. This one is 2/3 sewn together. I will say I dont think Ive ever made an all flannel one, and I dont love it. It came out really bumpy on the seams. Still learning on the 8th try.

This one came from Pinterest land. I don't spend any time with infants, but the few times I do, I get spit up on. I saw a similar design and looked at the tutorial and adjusted it to what I had on hand. I know I have seen some sad looking burp cloths in stores. I wanted super thick and absorbent pad with a shoulder cut out. I had white wash cloths I got at wally world in a huge pack with colors for a few dollars for ever ago and made travel toothbrush holders. I needed to use those up. I sewed two together and liked the size and then cut batting the same size and two pieces of flannel with a 1 inch allowance. I stacked them in the following order: batting, washcloths with seam down, backing flannel face up, top flannel face down. Pin all side then lay a plate down in the center and cut a semicircle. Stich edge closed twice by using and 3/4 seam allowance and leave a 2" opening on your longest side. 

Before flipping right side out, I trimmed the corners and excessive batting and washcloth from edges and snipped the inner curve so it would flip smoothly. 
I made two and plan to finish them by topstitching and basic quilting. Love them and hope to make a "Daddy" set, because I found more wash cloths I had stashed away. Only if I can find Celtics, Patriots or Red Sox fabric in the Pacific Northwest.

Saturday, July 6, 2013

Canvas iPad Case

Today was an amazing beautiful summer Saturday, despite my hubby's attempts I wasn't feeling like leaving the house. I decided to get some sewing projects going. I spent some time on Pintrest looking a baby clothing ideas. One of my best friends is having her first baby!!!! I am so excited, I want to make one of everything for her and the baby!
When I sat down with my iPad next to the stack of fabric and a million ideas floating in my head. I settled for finally making a iPad case for myself and a tutorial for you instead. Oh, how my brain works...
I got started by getting out the computer case I made awhile back for my hubby. I wanted to make similar style cases so they could be used together. I refreshed my memory of things I wished I had done and recalled order that worked well when putting it together. 
First, I measured the iPad, which was 8x10, and I was able to figure the size of the pieces to cut:
- 2- 9"x11"-Sturdy fabric- I used Red canvas for outer fabric, later Side A and Side B.
- 2- 8"x10"- Peltex- Stiff flexible material that works for creating items that need to maintain their shape- I found this on a rack at Joann's -It is expensive compared to fabric but, makes this project seem store bought and create lots of padding for the iPad.
- 4- 8"x10"- Batting- I used scraps of cheaper thinner batting I had.
- 2 9"x11"- Flannel- I used Tan baby flannel I had for a lining fabric.
- 2- 5 1/2"x 7 1/2"- Sturdy Canvas- I used Black canvas scraps for a tab closure.
- 1- Polygon 5" x 11" x 7" x 9"- Sturdy Canvas- I used a Black canvas triangle scrap I had that was already very close to this size and simply trimmed the thinnest point off to make it a four sided polygon pocket.
- 1- Large Button- I used I big vintage black one I had in my stash.
When it was all cut out then I got to sewing:
a.To create Side A: lay out one outer canvas rectangle, center one sheet of batting, then add one Peltex and then another sheet of batting. pinning it in the middle with a one inch spacing from edge to hold while "quilting" it together. (see image below) Canvas side down I stich a few lines that serve two purposes in creating Side A. One, to hold the Peltex and batting in place. Two, when using contrasting thread to create some decoration on the showing side.

b. Quilt your lines in a pattern you like on to Side A, I didn't use any guide line. but it would help if you care about straight line, which I obviously dont. (see image above)

c. Take two small tab pieces and sew together on three sides, using a 1/4'' seam allowance and leaving one 5 1/2'' side open. Turn right side out and press.
d. Using a 1/2'' seam allowance top stich around the three sewn sides of the tab (slightly visible in image above).
e. Place and mark where button should go using pins on either side and use machine's setting to create a large button hole, cut open hole and remove canvas excess. (see image above)
f. Take canvas pocket piece. fold and iron over long top edge 1/4'' sew. Fold again and sew to create finished edge.
g. In order to create Side B, attach pocket by lining it up with other outer rectangle, with folded pocket edge facing outer side. Pin and top stich using a 1/4" seam allowance on three sides of pocket. I reverse a few times at tops of pocket attachment to outer canvas.
h. With Side B, pocket side down layer on: one batting, one Peltex, one batting centering with inch border and Pin.
g. "Quilt" a few lines that will serve three purposes; First, to "Quilt" batting and Peltex in place, Second in order to create a decoration cohesive to the other side. this may create a need for marking or pinning if you want items lined up. I of course just eyeballed it (Gasp!) and Third, to create pockets, yes pockets. One giant pocket with no closure just allows things to fall out , but when divided it gets tighter and better job of keeping items in and not sliding around. Plan out pocket "quilting" based on what you would like to carry in your case. I thought a pen and charger.
f. Attach tab to Side B, by centering it and pining open/raw edge of tab to the middle of 9" of Side B opposite pocket. Using 1/4" making a few passes.
g. Along same side as newly attached tab of Side B pocket facing up and tab folded in, line up and pin flannel lining rectangle. Sew along tab egde (9"side) using a 1/2"seam allowance, so our 1/4" tab seam allowance is covered.
h. Fold out (see image below) and fold back you can press flannel  that is rolled under edge of canvas and tab is sticking up, then top stich this seam only, using a 1/2" seam allowance.
i. Fold Side B lining back over to sew bottom pocket edge. This will later ensure that lining will close up at bottom of case, a mistake I learned from creating the computer case. Flip right side out and press bottom edge.
j. Take Side A and line up other lining piece to outer side. Sew both 9"sides and then flip lining around (see image below). Press so lining dosen't show over canvas edge.
k. Top stich one 9'' side you deem as the top, using a 1/2" seam allowance.
l. Line up top stitched edges of Side A and Side B with canvas sides up flannel down and line up tab of Side B onto Side A for placement of Button. Pin where button holes should be.
m. Hand sew button onto canvas side of Side A and test button hole. This will be easier to fix now rather than later once sewn together, lesson learned.
n. Line up canvas sides together Side A and Side B and stitch using a 1/2" seam allowance along 2- 11" sides and bottom 9" side, you should be close to Peltex edge when joining the two sides and creating a large pocket with tab at top. I sew this seam twice and reverse at pocket top edge.
o. Trim two bottom corners and loose threads (see image below).
p. Flip case and poke out corners with pencil eraser end.

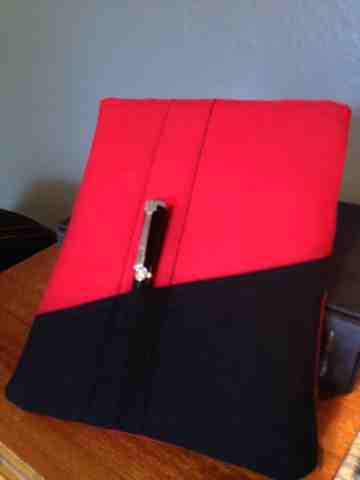
Tada! iPad case completed in 2 hours. So happy I got around to making this awesome case and tutorial. I know my directions aren't super precise and neither is my sewing. I am a learner and creator, which isn't always perfect. I hope you will add your own style and make it your own instead of making one just like mine.

Finished Side A, with flipped over Side B tab closure.

Finished Side B
Now back to deciding which project to work on for the new Baby!
Powered By Blogger