Saturday, July 6, 2013

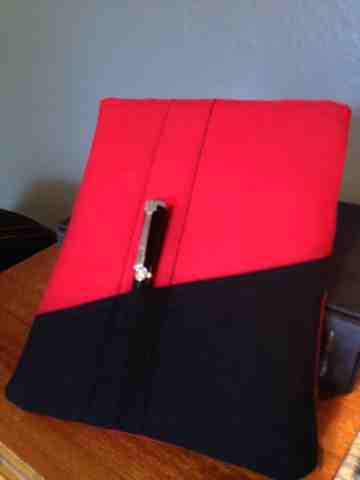
Canvas iPad Case

Today was an amazing beautiful summer Saturday, despite my hubby's attempts I wasn't feeling like leaving the house. I decided to get some sewing projects going. I spent some time on Pintrest looking a baby clothing ideas. One of my best friends is having her first baby!!!! I am so excited, I want to make one of everything for her and the baby!
When I sat down with my iPad next to the stack of fabric and a million ideas floating in my head. I settled for finally making a iPad case for myself and a tutorial for you instead. Oh, how my brain works...
I got started by getting out the computer case I made awhile back for my hubby. I wanted to make similar style cases so they could be used together. I refreshed my memory of things I wished I had done and recalled order that worked well when putting it together. 
First, I measured the iPad, which was 8x10, and I was able to figure the size of the pieces to cut:
- 2- 9"x11"-Sturdy fabric- I used Red canvas for outer fabric, later Side A and Side B.
- 2- 8"x10"- Peltex- Stiff flexible material that works for creating items that need to maintain their shape- I found this on a rack at Joann's -It is expensive compared to fabric but, makes this project seem store bought and create lots of padding for the iPad.
- 4- 8"x10"- Batting- I used scraps of cheaper thinner batting I had.
- 2 9"x11"- Flannel- I used Tan baby flannel I had for a lining fabric.
- 2- 5 1/2"x 7 1/2"- Sturdy Canvas- I used Black canvas scraps for a tab closure.
- 1- Polygon 5" x 11" x 7" x 9"- Sturdy Canvas- I used a Black canvas triangle scrap I had that was already very close to this size and simply trimmed the thinnest point off to make it a four sided polygon pocket.
- 1- Large Button- I used I big vintage black one I had in my stash.
When it was all cut out then I got to sewing:
a.To create Side A: lay out one outer canvas rectangle, center one sheet of batting, then add one Peltex and then another sheet of batting. pinning it in the middle with a one inch spacing from edge to hold while "quilting" it together. (see image below) Canvas side down I stich a few lines that serve two purposes in creating Side A. One, to hold the Peltex and batting in place. Two, when using contrasting thread to create some decoration on the showing side.

b. Quilt your lines in a pattern you like on to Side A, I didn't use any guide line. but it would help if you care about straight line, which I obviously dont. (see image above)

c. Take two small tab pieces and sew together on three sides, using a 1/4'' seam allowance and leaving one 5 1/2'' side open. Turn right side out and press.
d. Using a 1/2'' seam allowance top stich around the three sewn sides of the tab (slightly visible in image above).
e. Place and mark where button should go using pins on either side and use machine's setting to create a large button hole, cut open hole and remove canvas excess. (see image above)
f. Take canvas pocket piece. fold and iron over long top edge 1/4'' sew. Fold again and sew to create finished edge.
g. In order to create Side B, attach pocket by lining it up with other outer rectangle, with folded pocket edge facing outer side. Pin and top stich using a 1/4" seam allowance on three sides of pocket. I reverse a few times at tops of pocket attachment to outer canvas.
h. With Side B, pocket side down layer on: one batting, one Peltex, one batting centering with inch border and Pin.
g. "Quilt" a few lines that will serve three purposes; First, to "Quilt" batting and Peltex in place, Second in order to create a decoration cohesive to the other side. this may create a need for marking or pinning if you want items lined up. I of course just eyeballed it (Gasp!) and Third, to create pockets, yes pockets. One giant pocket with no closure just allows things to fall out , but when divided it gets tighter and better job of keeping items in and not sliding around. Plan out pocket "quilting" based on what you would like to carry in your case. I thought a pen and charger.
f. Attach tab to Side B, by centering it and pining open/raw edge of tab to the middle of 9" of Side B opposite pocket. Using 1/4" making a few passes.
g. Along same side as newly attached tab of Side B pocket facing up and tab folded in, line up and pin flannel lining rectangle. Sew along tab egde (9"side) using a 1/2"seam allowance, so our 1/4" tab seam allowance is covered.
h. Fold out (see image below) and fold back you can press flannel  that is rolled under edge of canvas and tab is sticking up, then top stich this seam only, using a 1/2" seam allowance.
i. Fold Side B lining back over to sew bottom pocket edge. This will later ensure that lining will close up at bottom of case, a mistake I learned from creating the computer case. Flip right side out and press bottom edge.
j. Take Side A and line up other lining piece to outer side. Sew both 9"sides and then flip lining around (see image below). Press so lining dosen't show over canvas edge.
k. Top stich one 9'' side you deem as the top, using a 1/2" seam allowance.
l. Line up top stitched edges of Side A and Side B with canvas sides up flannel down and line up tab of Side B onto Side A for placement of Button. Pin where button holes should be.
m. Hand sew button onto canvas side of Side A and test button hole. This will be easier to fix now rather than later once sewn together, lesson learned.
n. Line up canvas sides together Side A and Side B and stitch using a 1/2" seam allowance along 2- 11" sides and bottom 9" side, you should be close to Peltex edge when joining the two sides and creating a large pocket with tab at top. I sew this seam twice and reverse at pocket top edge.
o. Trim two bottom corners and loose threads (see image below).
p. Flip case and poke out corners with pencil eraser end.

Tada! iPad case completed in 2 hours. So happy I got around to making this awesome case and tutorial. I know my directions aren't super precise and neither is my sewing. I am a learner and creator, which isn't always perfect. I hope you will add your own style and make it your own instead of making one just like mine.

Finished Side A, with flipped over Side B tab closure.

Finished Side B
Now back to deciding which project to work on for the new Baby!

Monday, April 22, 2013

Quick Fold Over Clutch

I needed a modern clutch for a wedding rehearsal dinner. This wedding and all of the events are rather dressy. I have spent money on a few items, mostly dresses. I want to make my own dress but fear it won't be right and I would have spent all this time doing it. I am not a seamstress Iam mainly a quilter. So, I shall leave dressmaking to another place in time.

I quickly realized I was going to have to settle on making an accessory. Jewels were out so I got it stuck in my head that I should do a clutch.
So this was the result to wear with my new cobalt jacket and my grey and black leather trimmed dress.

I had a few tricks to making this bag in only a few hours.  I dont have exact measurements to share. I would like to share my process on making these. It is much like other things, I look at something, size it up, then make slight alterations (usually aesthetic design). 
I see fold over clutches in style, which lead me to pick  up one in Forever21 opened it and checked out the construction. I didn't like the color or cheap chain. I went home empty handed to my bins of fabric. This silver vinyl has served its purpose for many creations. I feel that vinyl is a great item to sew with because it is so durable. I use my cheap Brother sewing machine and it sews through with a newer needle with great ease. I rarely sew through multiple vinyl layers, I cannot attest to that.
 I like duck cloth canvas too much and have a nice stash. After a few projects the silver is running low so I basically decided on the exact size for the clutch based on the size of vinyl scrap I had. From that I cut the canvas at the same width. I use a self-healing mat and rotary cutter with ruler, I just didn't look at the measurements really. I realize that seems odd, I find that I get a better looking finished piece if I go with my gut rather than the inch. There is a lining that came from a purple pillow case and a grey zipper inside. The zippers I keep on stash. I buy them longer than most and cut them down to size if needed. It seems to be easier to cut one down than make it longer. I box in the zipper in 2-3 wide strips of canvas. 
Then added the vinyl end and canvas to the other. Attached the lining with a small hole in the bottom for turning and inserted some rectangles of poly fiber board. It is the secret in making it stiff and keep its shape. I cant wait to use it! It is awesome that it cost me so little, and if someone likes it, I get to say that I made it.

Earth Day

Iam a huge fan of Earth Day, I love natural sciences and enjoy digging in the dirt. I have tried to make it a tradition in the last few years to plant something for the awesome day.

This year we did more digging in the dirt than normal. I planted two heirloom versions of tomatos. I found the rosemary in the half off section of a small garden shop down the street. They also had free japanese maple saplings for Earth Day celebration. I weaved they two together. I really really hope they take root.


Strawberries in a hanging basket should sprawl well. We wanted all of the outdoor items in containers because we expect to move mid summer.
We also purchased three bio-degradable containers. They wont bio-degrade in 10 years but, if it they do end up in a landfill they wont take as long as plastic.

I love the ridges in the low ones for succulents. I already had the succulents they just needed to be spaced out better. Love your mother.

Thursday, April 4, 2013

Yummy Yarn Creations

I ended up with a lovely cowl for me and a chunky beanie for my hubby. I am over the moon about the green cowl. The alpaca is so soft next to my face. I have a bit left over and intend to make myself a beanie. This cowl looks rather dressy and causal at the same time. I have also discovered that it fits over my head like a hood on those blustery days. I might have to put it up for a few months, but I can wait to rediscover this staple item when winter rolls back around. I did not use a pattern to create this cowl. I  just started with a circle size I liked and then added a few stitches every few rows in order to make a cone shape. I ended up with some extra yarn and intend on making myself a beanie.
I am wearing my hubby's beanie in this lower shot. It fits me too, major bonus points. Again, no pattern used. I started at the crown with a rather large hook and simply had him try it on as I went along, adding stitches as needed. I enjoyed that the yellow created a swirl pattern. This was a lovely yarn to work with and will indeed be a warm item.  I do tend to like my beanies a bit slouchier than this, but I started to run out of yarn and at $15 a pop (skein) I wasn't about to run down the street to buy more.

Stay warm this chilly spring my friends!

Oh, I just realized this is my 200th post! :-) I didnt know I had that much to say over the last few years. I love this more for me than any viewer, but its nice that you are out there! Leave me a comment sometime.

Saturday, March 16, 2013

Yummy Yarn


There is a beautiful yarn shop that is walking distance from our house in Eugene. It is trouble. I had spent some of my birthday money on some chunky alpaca yarn. These beauties are not cheap.  I never pay this much for yarn, but I wanted to use good thick yarn so it would a substantial piece. Plus it is something good on the hands to work with. I have wanted to make a nice piece for me and hubby for awhile. I am going for a hat in the navy multi-colored and large cowl for me in the emerald. It is chilly here today and I think Ill get busy. I know spring is in the air, but we will use these for years to come.

Tuesday, March 12, 2013

Embroidered Patches

I wanted to add some detail to my Scrappy Beginnings. So, Ive been working on these colorful embroidery boarders while I am waiting for spring to happen outside my window. I love these color combinations. Ive just got to do the other panel for the other side of bag. I stuck with the crazy notion of what ever I feel like goes with these bags. Reminds me of a sampler or vintage crazy quilts, except in modern colors. I havent embroidered in awhile. It is quick and simple, but yet creative and carefully planned.  Ive decided to work more in embroidery because I am not stuck behind a sewing machine. Sewing is a rather isolating task/hobby. I am trying to not isolate myself as much.

Knots

This fabric "yarn" has been in a ball of knots for a few months now. It is destined to be a large container basket/ bowl. Its is a bit how I personally feel. My brain feels knotted up, not sure which way to go. I had have had a harder time than I expected. I miss green grass and blue skies. There is nothing quite like home and yes I miss North Carolina. Oregon is a beautiful state and feel fortunate that we are here. I just wish I could feel more comfortable here. I wish I could untangle my brain so that I could relax.
I have kept this yarn near my bed for a couple of months, it was tossed aside when it got tangled while crocheting a basket/ bowl. I got frustrated so there it stayed. I decided to untangle it in hopes that it will help me relax. It took me way longer than I expected and actually ended up cutting it, which equals failure to me when untangling knots.
Iam thinking of this as a metaphor, a soul needs untangling, sometimes it takes way longer than expected and sometimes ties/bonds need to be severed or altered. I wonder if I will have to change or what I need to let go of. All that makes me rather sad. So did completely untangling the knots in the fabric "yarn". When it was done, a part of me wanted to unwind the two large balls and tangle it all back together.

Monday, March 4, 2013

All in the details

I love a sweatshirt, I dont particularly love how boyish I look in them. I was in the dreaded wal-mart the other week , looking for cheap yoga pants, and I was thrown off course by this huge display of $3 Hanes sweatshirts in the middle of the bathing suits. It's spring ya'll! I grabbed up this awesome blue and brought it home and stuffed it in the drawer . I got ready to wear it the other night and decided that the rounded neckline had to go. I went for it with the sharp scissors. I wanted an off the shoulder with a low v-neck. After holding it to myself to decide how wide to make the cut, I  smoothed it out on the table folded in the center (shoulders together) and cut straight lines. I never drew a line, I just went for it. I have very very very sharp heavy long dress making shears that made this beautiful neckline cut possible through 4 layers.
I would recommend penciling your lines in, using a ruler and cutting each side separately, if you dont have baller scissors like I do.

As soon as I cut it, I put it on to see if it was as I planned. Perfect. When I put it on I noticed the seams on the shoulders were pulling apart because I had cut the ending knot out. Not so perfect. I thought for a moment about grabbing the same color thread and fixing the seam. Then I remembered seeing awesome embroidered sweatshirts on Pinterest. Oooh and this.
I found my favorite color, salmon peach, and went for it. I knotted the seams back carefully. and then did a super easy dot dash pattern. I may add another color row, but I wanted to wash it to see if it rolled up at all after wash and dry. I am concerned that the embroidery will get "eaten" by the roll that normally happens on raw edge fabric. 
I love it now and hope that dosent happen. I love that it is kinda girly and screams "Look at me, I make stuff, and I think I am awesome!"
 I am tempted to go buy more $3 sweatshirts. I will not, but you should! This was super easy and maybe took me 20 min to make. It could take all day if I kept elaborating on the pattern. Great future gift idea too! Super cute for kiddos stuff too!
Hell, I could put a bird on it if I wanted to! Imagination is the limit!
Okay enough exclamation points...

Sunday, March 3, 2013

Wallet made

I ve been on the wallet hunt, I have a very large designer leather wallet. It is not really practical when you are thinking about camping and taking backpacking trips. I wanted something smaller and thinner. The ones that are typically that size are for boys or childish. I have been on the hunt with no luck in the retail world, so I decided to make one.
 I found this lovely bi-fold wallet tutorial by Modest Maven through a Pintrest rabbit trail search. I was super excited that it didnt require anything of me that I didnt have. I used velcro instead of the snap like the tutorial suggests. I did feel that the bill lining part was not quite the correct size. I ended up cutting a 1/2 off making it 4 x 9 and it still rolled over the edging. Otherwise the directions were super easy to follow and make a perfect size bi-fold.


I was able to make this one in about 1.5 hours (while eating lunch) I am sure I can do it faster if I wanted to churn them out. I know that one side of my card slots got out of line. This purple fabric I have had for ever and have 6+ yards that I got on clearance at Mary- Jo's. It is not a quilt weight cotton. Its very stiff but not very thick. Other than cotton, I am not sure how else to describe it.
The super awesome stripe fabric is a Kaffe (which I am unable to find on his website :-P ) the stripe is rather thin. I did use stabilizer on both pieces of it. I would like to make this again with a zipper coin side.
Can wait to start using this awesome wallet!

Thursday, January 31, 2013

Scrappy Beginnings

I saved almost every scrap from my Kaffe Quilt I made a year ago. These were end pieces from the color themed strips. I pieced them together and end up with nice size rectangles. I love the stagger piecing and that I am using up this amazing fabric. With no real planned out intentions I added cotton batting and backing fabric. I want to hand embroidery each pannel and make them into....
Who knows. I am not your typical following the pattern/direction girl. I generally look at an image an go for it. I think some thing with a zipper. I've got a nice stash of zippers I got at a Joann's closing. I do love the patchwork it made. I like the dark one a wee bit more than the pale.

Sunday, December 16, 2012

Scrappy Christmas Trees

I made these last year as gifts. There were about 20, but now I only have about 5 left. I think this was one of the easiest gifts to make. I found the strips in my stash bag. Made a few color schemes and cut out triangles. I used upholstery fabric for the trunks and fleece scraps for the backs. Small ribbons were sewn in to create hangers. Some had jingle bells and some had buttons. on the top like a star. I liked these especially for homes with small kids and animals who like to attack the tree.
I like that each one is different and unique. I think I would put the cost at a roll of ribbon and a bag of poly fill, so about 5 bucks for 20 gifts. The scraps were all from quilting projects that I had made my money off of prior. So to me that was free. I love using up the items that I hold onto forever.

Beaded Snowflakes

I have been making these beaded snowflakes for years. I got a small kit when I was 13 or so that had directions, wire and beads. I used the beads and wire up years ago, but always seem to have the supplies to make more. I never get tired of making them. No matter the size of beads the patterns always work. It is nice to have a pair of jewelry pliers to help pull and wrap the wire at the end. I think they make rather nice looking ornaments. I have given them as sets or just singles tied to gifts.
This year, I used vintage beads from broken necklaces along with small silver beads from Michael's. In about 30 minutes and very little money I can make one snowflake. I usually put on a Christmas movie and make a few.  I love how these turned out. I decided to keep these for myself. I live how they twinkle with lights and stand out against the green tree.
I put them on this wire tree I made to display items. I made the tree put of a heavy iron plate and green floral wire. I just wrapped and twisted away as I saw fit until the branches seemed strong enough to hold up the items. It has been a nice accessory for Christmas display as well. Wire is fun to work with and has limitless creativity.


Powered By Blogger